It became apparent to my husband and I recently that our home was in desperate need of re-tiling. Many of the existing floor tiles in the main living area were cracked and chipped and deep pockets had begun to emerge in the grout. A crack above our stove, a crack in the guest bathroom wall and cracked bathroom floor tiles in the upstairs bathroom also screamed for attention.
First things first
In total we calculated we had to re-tile approximately 60sqm’s. Figures in hand we went to a local tile supplier where we walked undecidedly up and down the aisles in search of options. Eventually with the help of a picture of our existing tiles and the advice that neutral is generally the way to go, we narrowed down our search to two tiles which we thought would work. One was fairly small and light beige in colour, the other was quite large and light grey.
We also selected a number of mosaic samples we thought would work in the bathroom and above the stove and chose a few samples for a bathroom floor border. Upon arrival at home, we played around with the sample tiles and mosaics we had purchased while there was still good light.
It became immediately apparent that the large, light grey tile would work best for the main living room area and upstairs bathroom, and that a mixed, light brown, grey and white natural stone and glass mosaic would work best for bathroom design. None of the samples we had selected suited the stove area yet one of the samples we thought would work well above the stove worked best as the bathroom floor border!
With the majority of the tile choices made, we contacted David - a tiler who was recommended by a friend who is also a developer by trade. As such we thought he would be a safe bet. We have heard many horror stories of people being robbed by fly-by-night tilers and of shoddy work being carried out. Luckily for us, David was honest, experienced and affordably priced.
Next step
Our tiles arrived complete with tile adhesive and grout a week before the tiling was due to take place. Unfortunately the materials were stored on an uncovered patio which meant we had to cover everything with plastic as any rain would have ruined the adhesive and grout. Another lesson learned.
The day before the re-tiling was set to get underway, we went on the hunt for something suitable for the stove area. Three stores and many hours later we finally settled on a slightly uninteresting yet neutral and practical mosaic which wouldn’t stain, absorb fat or crack – all of which are important considerations for cooking areas. The problem was, the supplier didn’t have the mosaic in stock and it would take three days to arrive. David had indicated that it would take three days to do the job so we figured naively he could do the stove area last, on the third day.
The night before the tiling was due to commence, we stored away as many of our possessions and furniture as we could, as we didn’t want anything to get broken or covered in dirt. Curtains were packed away and anything that couldn’t be moved was covered with sheets.
Getting the job done
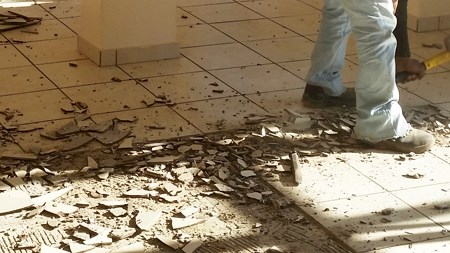
On the allotted day, David and his crew arrived right on time and immediately got to work. Hammers and chisels banged away and tile chips flew most of the day. Thankfully the old tiles were lifted and cleared within mere hours and David and his crew got down to laying some of the tiles before the sun set.
After the tilers had left for the day we retreated upstairs as it was impossible to do anything downstairs. This aspect is important to keep in mind if you are considering re-tiling. As is the case with all things construction related, it is virtually impossible to carry on with your normal routine in the midst of such work. You will be uncomfortable and there will be upheaval.
The tiling project commenced once again at the same time the next day. The tilers moved quickly and before long most of the living area was covered and work had begun on cutting the tiles to create skirting. The tiles on the bathroom wall were carefully removed and the area above the stove was prepped, much to my concern as the mosaics for this area had apparently been delayed.
On what was supposed to be the last day, David and his crew once again arrived bright and early to finish the job. The last of the living room floor tiles were laid, the skirting was finished, the bathroom wall mosaic was set and grouted and the upstairs bathroom floor was lifted and retiled. Unfortunately we were informed the mosaics for the stove area had now been delivered to the wrong depot which meant that David would have to come back another day which he duly did. The end result was a beautifully tiled home which looks elegant and welcoming.
 Photo credit: Jackie Gray-Parker
Lessons learned:
- With a little shopping around and careful budgeting, it’s quite possible to re-tile your home affordably while adding value at the same time
- Generally speaking it’s better to hire people who are recommended by family and friends.
- Play fair: If your tiler has to come out an extra day because of an error on your behalf, pay extra for the petrol and the inconvenience. Likewise it’s only fair to provide some basic refreshments throughout the day for those toiling on your floors.
- Check for hollow tiles: We knocked on the tiles at the end of each day to check if there were any hollow spaces. We pointed out the few that did sound hollow to David who happily whipped them up and re-laid them.
- Try to organise the tiles and materials you want well ahead of time. If your tiler moves quicker than anticipated and your tiles haven’t arrived, it can delay your project.
- Mix and match samples – you might be pleasantly surprised by what works and what doesn’t.
 Photo credit: Jackie Gray-Parker